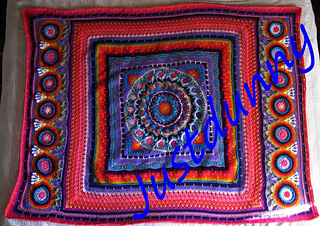
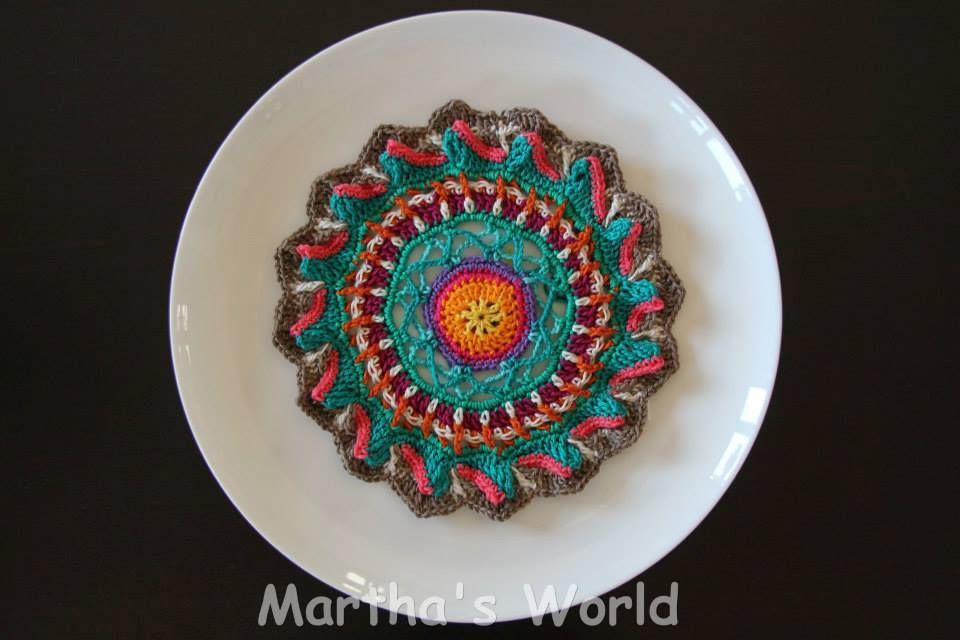
“Magic Carpet Ride” - Mandala experiment pattern
by Justdunny (Toni Andmarc). Please leave some kudos so I know you’ve been here.
Enormous thanks to Angela Armstrong, Martha Vitez and Oona Linnett for the harrowing experience of proving this pattern. The original photos (Justdunny) include many mistakes. Photos inserted in the text are of the proven version. Please note all rights are reserved.
In allowing access to this pattern, I grant the right to make this blanket for personal use.. It would be a pleasure to be acknowledged as the designer. Please do not copy, reproduce, re-post or distribute.
I have posted the outer part of this pattern here -http://justdunnycrochet.svbtle.com/magic-carpet-ride-outer-part-medallions
MATERIALS
I’ve used 8 ply (DK) acrylic with a 4.00mm hook. The yarn weight is not important as long as it’s consistent throughout. Just be aware of the quite open part where the end medallions join on. The finished size is about 18” (45 cm).
NOTE UK terms are used in this pattern.
Please start rows with ch or a standing st and end rows by slip stitching to the first st.
COLOURS:
Below is a list of colours used in the blanket row by row. You are of course free to choose whichever colours you wish.

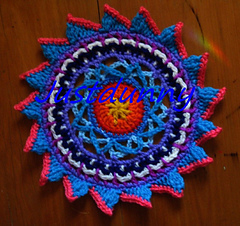
NOTE – when I made this, I didn’t do the maths, so this version has 17 points. Other photos inserted into the following pattern are produced from the corrected pattern.
Remember to refer to the colour table above if you wish, or with your palette change colour with each row.
- Into ch ring or magic ring, work 1 tr, 1 ch, 8 times.(16)
- Work 1 tr into each tr, 2 tr into each ch sp. (24)
- Work 2 dc in next st, 1 dc in next two. Repeat to end. (32)
- Work 2 dc in next st, 1 dc in each of next three. Repeat to end. (40)
- Join to any stitch. CH 10, skip 4 sts, dc in next. Repeat to end. (88) with 8 loops.
- (Also worked into round 4) Join to ring at first dc to the right of an Round 5 dc. Work exactly as for the last row, keeping work behind the round 5 loops. (88) with 8 loops.

A close up of row 6 by Martha Vitez
- Work 1 dc into 7th ch of a round 5 loop, 2ch, 1 dc into 4th ch of the round 6 loop, 5 ch. Repeat to end. (72)
8 (same colour as round 7) Work 1dc for each stitch around (72)

A closeup of rows 7 and 8 by Martha Vitez
- 1 tr into next 2, 2 ch, sk 1. Repeat to end. (96)
- Working behind the round 9, 1 dc into each tr, 1 dtr into 7th row at ch sps. Repeat to end. (72)
- Work 1 tr around body of round 9 dtr, 1 ch, 1 tr into space between row 9 trebles, 1 ch. Repeat to end. (96)
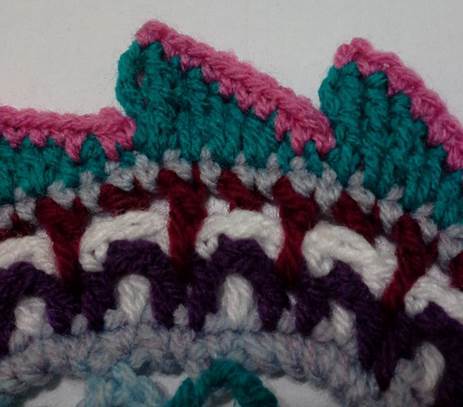
Row 11 being worked around the post of the row 10 DTR. Copyright Angela Armstrong

Row 11 completed by Martha Vitez
- Work 1 dc into each ch sp, 1 dc into each tr. Repeat to end. (96) sts (96)
- Work [1 dc into the first stitch, 2 htr into the second, 2 tr into the third, 2 dtr into the fourth, 1 ttr in the fifth, 4 ch, sl st to the base of the ttr in the fifth stitch. Sl st to the next st. Repeat to end.] sl st into the final stitch 16 points – each using 6 stitches from the previous row. (160)
Row 13 completed by Martha Vitez
- Work 1 dc in each st to the point, 4 ch, sl st into the base of the ttr so it sits out of sight, 2 ch (or more if needed), sl st to sl st at start of next point. Repeat to end. (There is a complete photo tutorial of this row below).
Row 13 and 14 close up – copyright Angela Armstrong

Work 1dc in each stitch until the point by Martha Vitez

Ch 4, turn your work over and anchor it in the back of the TTR by Martha Vitez

Chain two by Martha Vitez

Slip stitch into the slip stitch of the round before by Martha Vitez

Slip stitch now complete and ready to start the next segment by Martha Vitez

Central Mandalas by Martha Vitez and Toni Andmarc

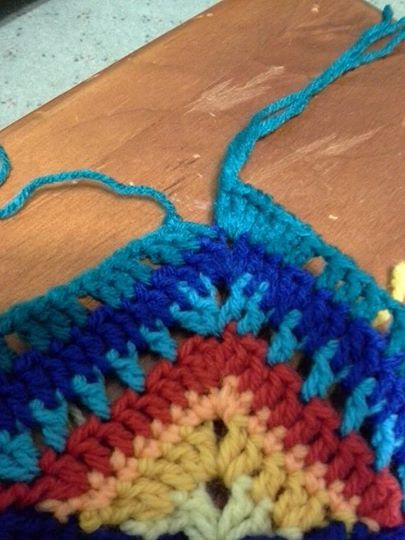
Join with sl st at the tip of an post at the back from row 13, (1 dtr, 3 ch, 1 ttr) into sl st at the base of the slope. 2 ch, 1 dc around the ch post at the back of work, 1 ch. Repeat to end.

Rows 15 and 16 close up. Copyright Martha VitezJoin to ch sp just to right of a row 15 dtr, 2 dc in ch sp, 1 dc into dtr, 1 ch. Into 3 ch sp, work (1 dc, 1 dtr [working behind row 15] into same place as dtr & ttr, 1 dc), 1 ch, 1 dc into ttr. Repeat to end.
Join to a dtr from row 16. 1 dc, 1 htr, 1 tr next 2, (1 dtr, 1 ch, 1 dtr) in next, 1 tr next 2, 1 htr, sl st to next. Repeat to end. (16 peaks)

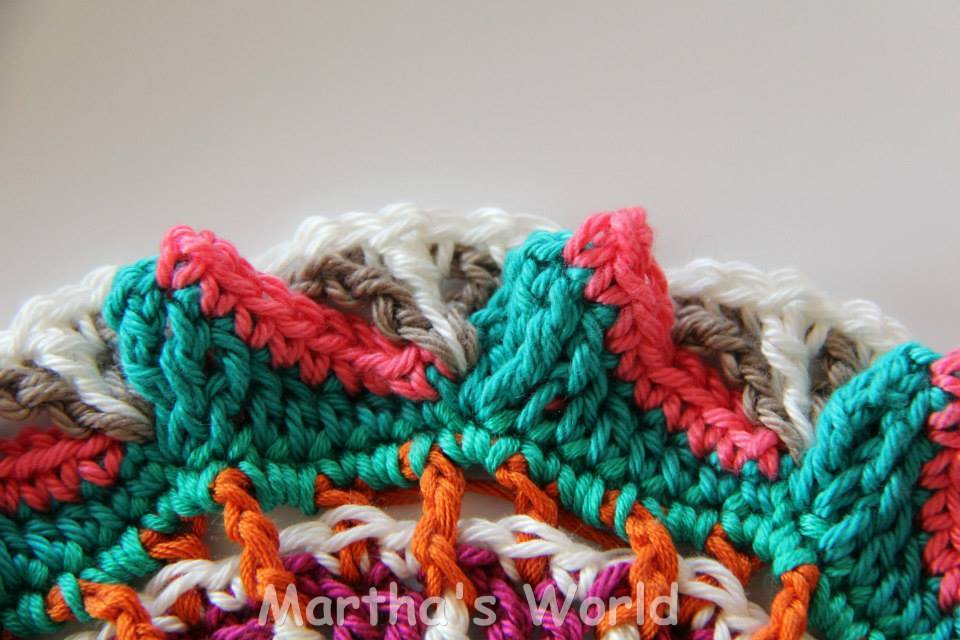
Row 17 complete. Copyright Martha Vitez

Row 17 complete - Angela ArmstrongJoin to first tr on right side of a point (ie, the first treble after the htr), 1 tr in next 2 tr, 1 tr in dtr, (tr, 2 ch, tr) in ch sp, 1 tr in dtr, 1 tr in next 2 tr, decrease = (draw up a loop in next 3 sts, draw through all loops), 1 dc in htr. Repeat to end.


Step 18. Copyright Angela Armstrong
- Join to first tr on right side of a point (ie, the first treble after the dc), 1 dc in each st to ch sp. Into ch sp, (1 dc, 1 dtr into row 17 ch sp, 1 ch, 1 tr into the body of the dtr just worked, 1 dc into ch sp), 1 dc into next 3, then work decrease as for previous row.

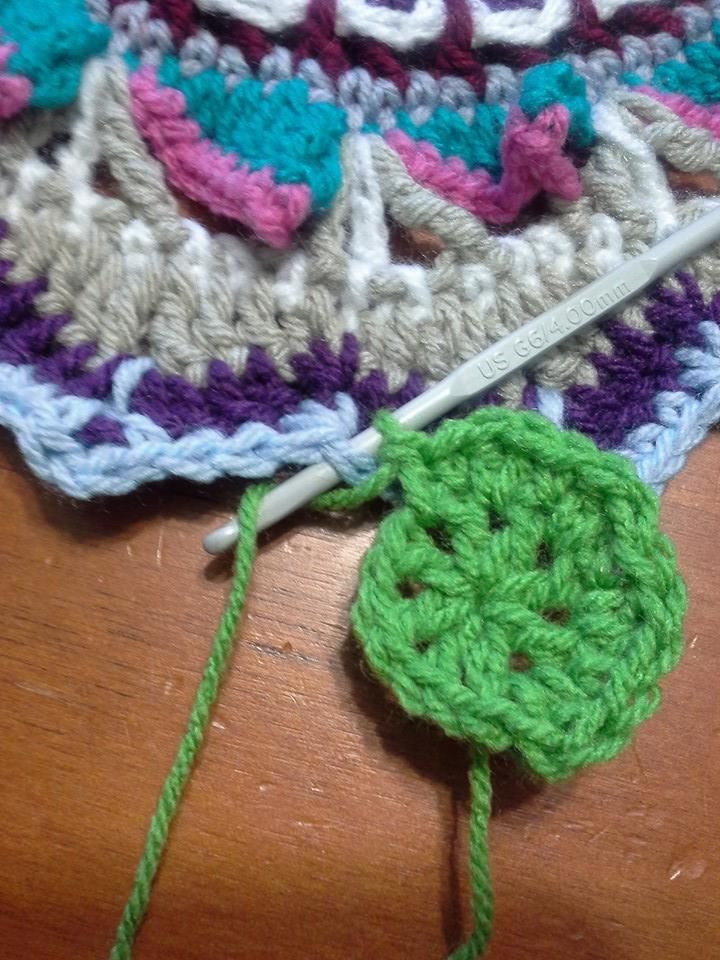
MAKE MEDALLIONS – 16 – various pinks

Into magic ring, work 1 tr, 1 ch, 8 times.
1 dc into each tr, 2 dc into each ch sp, but at some point, draw the working loop through the dec st between points to join to work and keep working to end. (See photo tutorial below).
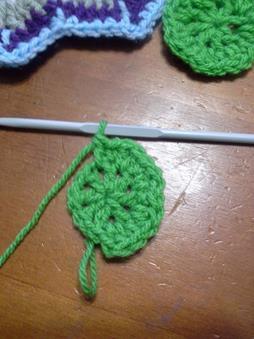
Please note - due to my error, this shows tr & dc used in the second row. Only dc should be used.
Oona has an alternative method for attaching the medallions to the main fabric which she says (and it looks it - I couldn’t bring myself to frog even one row of all the medallions) gives a much more stable finish.
Rather than attaching your medallion with a single stitch into the decrease stitch, attach it with two stitches into the decrease stitch and one next to it. It gives a more stable join. (See beautiful pic below).

Step 21. Copyright Angela Armstrong –
Work half a medallion. Stop after completing the first of two dc in a ch sp.
Step 21. Copyright Angela Armstrong. “Put your hook through the decrease stitch from row 19 and yarn over”

Step 21 Copyright Angela Armstrong - “draw the loop up through the decrease stitch".

Step 21. Copyright Angela Armstrong – “draw the same loop through the loop originally on the hook from the top of the treble.
Now work the next treble as though you hadn’t paused and continue to finish the medallion.”

Martha Vitez
It’s up to you whether you make one medallion at a time and join as you go, or whether you make them all up front and join them at the end.
Part 3
Step 22:
Join between the second treble pair above where the medallion is joined to the main fabric. Work 1dc in this stitch and then (2dc in the next, 1dc in the next two stitches) three times, 2dc in next stitch, 1dc in next stitch. (16 stitches worked into 12 stitches). ** see note below** half treble into the chain at the peak of a row 19 point. Repeat until end.
**note: the pattern called for ch1, tr into the peak, ch1. I found this left my medallions with a huge gap at their base and made them rather dangly. When I looked at the designer’s version, the gaps were quite small, hence the modification. You may wish to remain true to the pattern and that is your choice, however it may also affect the way the following rows are worked and you would need to adjust YOUR version accordingly.

Step 22 Complete. Copyright Angela Armstrong
Step 23:
This round is worked from the back, so you will insert your hook to the right of a stitch you wish to work FROM THE BACK, around the post of the stitch and into the space on the left, yarn over, drawing the loop back to the front and then around to the back again. This is to make the stitches from Step 22 stand out.
It will be tempting to work these tightly. Don’t. If you do, you will lose sight of the yarn coming around the front, and although the top of the stitch will make a nice ridge, you won’t get that fabulous contrast of colour. So don’t strangle them, lol, work around and give a little extra tug once you bring that loop to the back to make sure it’s a tad longer than just barely through.
With a new colour, skip the first stitch into any medallion and work 1 DTR, 1ch. Skip the next stitch and work 1tr into the next. 1 half treble into the next 2, 1 DC into the next 4. 1 half treble into the next 2, 1 treble into the next, ch1, skip the next stitch. Work 1 double treble into the next stitch.
Repeat this for every medallion around. (You can either do a standing stitch start, or chain 4 + ch 1 for the pattern).
NB: The original says do a TTR but I found that was too tall. If it suits you better, work with the longer stitch, this will not affect your stitch count.
Basically the aim of this row is to create a solid ring around the entire work so that the next part can be worked into it. It should hopefully be a round shape without peaks.

Step 23 and 24 complete. Copyright Angela Armstrong
step 24:
With a new colour, work 1dc in each stitch and 2dc in the chain spaces - 256 stitches.
To clarify - the 2 in the chain space do not include the next stitch, work that as well, so there will be 3dc between the post parts of the stitches bracketing them if that makes sense?
At the end of step 24, you should have 256 stitches.

Step 24 complete. Copyright Martha Vitez
Step 25:
I can’t emphasise enough how important it is to keep counting on this row. It’s easy to switch off and watch tv, but keep going back and counting. If you get distracted, double check before you start again. I got to the end and had five stitches left over!! I’d been picking it up and putting it down all day. Count count count.
Oona Linnett also points out something important - if you start your row directly above the middle of a medallion, then your V stitches at the peaks should also coincide with the middle of a medallion. I did mine randomly and was lucky, but it gives an overall more pleasing visual effect to align them all.
The circle is divided now into 8 sides to create an octagon - 32 stitches per side. (Four corners will be worked between a pair of points each).
picking any point on the circle -
*1 dc in the next 3 st
1 htr in the next 2 st
1 tr in the next 5 st
1 dtr in the next 3 st
1 ttr in the next 2 st
(ttr, 1ch, ttr) in the next stitch to make a peak
1 ttr in the next 2 st
1 dtr in the next 3 st
1 tr in the next 5 st
1 htr in the next 2 st
1 dc in the next 4 st
Repeat from * until the end. You should have 8 points.
A huge thanks to Martha Vitez who worked out that the second lot of dc’s should have 4 and not 3 - so you’ll end up with 7 in a row between the peaks.

Step 25 Complete. This is now an octagon. Copyright Angela Armstrong
Step 26: find the middle dc of the seven dc on any side - count to the third stitch to the right of that and join there. Work (2tr, 2ch, 2tr) into the middle stitch, then count to the third stitch to the left of there and slip stitch. Tie off.
Step 27: Join to the third stitch to the right of the join of the last row. 2tr in the first stitch, 1tr in next stitch, (2tr, 2ch, 2tr) into corner space. 1 tr in next stitch, 2 tr in final stitch. Count to three stitches to the left of where the previous row joined and slip stitch there. Tie off.

Steps 26 and 27 complete. Copyright Angela Armstrong
Step 28: Join to the stitch to the right of the join of the last row. Work 2dc in the first st, 1dc in each st until the corner space. In the corner space work (2dc, 1ch, 2dc). 1dc in each stitch until the last where you will work 2dc. Go to the stitch to the left of where the previous row joined and slip stitch there. Tie off.
Step 29: Join to the third stitch to the right of the join of the last row. Work 2tr in the first stitch, then 1tr in each stitch until the corner space. (2tr, 1ch, 2tr) into the chain space. 1tr into each stitch until the last one where you will work 2tr. Count three stitches to the left of where the last row joined and slip stitch there. Tie off.
Step 30: Join to the third stitch to the right of the join of the last row. ch1, 2tr into the first tr of Step 29. (1ch, skp1, 1tr) 5 times. Into the corner space work (1tr, 3ch, 1tr). 1tr in next tr. (1ch, skp1, 1tr) 4 times. ch1, sk 1, 2tr into next st. ch1. Count to the third stitch to the left of where the last row joined and slip stitch there. Tie off.
Step 31: Join to the corner ch space of the octagon. Slip stitch into the triple treble that forms the left side of the corner space. 1dc in next stitch. 1htr, 1ch in the next. 1htr into the same stitch as where the last row joined. 2tr into the chain space of the last row. 1tr into each tr and each chain space until the corner. (2tr, 2ch, 2tr) into corner space. 1tr into each tr and each chain space. 2tr into chain sp. 1htr into the same stitch where the last row joined the hexagon. 1ch, 1htr into next st. 1dc into next stitch. slip stitch into the next stitch and into the hexagon peak. Tie off.

Step 31 complete. Please note that there are extra stitches in this image for the aqua row (30). Ignore them. Copyright Angela Armstrong
Step 26: 4 tr and 2ch
Step 27: 10 tr and 2ch
Step 28: 16 dc and 1ch
Step 29: 22 tr and 1ch
Step 30: 16 tr and 15ch
Step 31: 34 tr, 2dc, 4 htr, 4ch
FRAME THE INNER SQUARE:
Step 32:
Beginning in the first tr of any corner pair of one side (see image below), (1 tr in the next three stitches, 1ch, sk 1). Repeat the bracketed section for the sides. Corners are worked thus: Into the chain space of the corner of the previous row, work 2tr, 2ch, 2tr.
You must end up with 19 lots of 3 trebles (plus two lots of two trebles at either end) on each side. Where and how you place the stitches is up to you, but you really need to achieve that 19. 20 will buckle slightly (which will become more pronounced as you continue working following rounds) and 18 will curl slightly which will become more pronounced as you work folliwng rounds).
This is most easily achieved by skipping working a stitch into the chains of the previous rounds for the sides.
Beginning and End of Step 32. Copyright Angela Armstrong
Step 33:
Start in the middle of any set of three trebles on one side and work one treble into each treble for the sides. When you come to a chain space (every 4th stitch) work one double treble down into row 31. Corners are worked thus: 1 double treble worked into the corner of row 31 between the two corner trebles and the first stitch. One treble into both of the corner trebles from row 32. Into the chain space of row 32 work (2tr, 2ch, 2tr). Work 1 tr into each of the next two stitches. Work 1 double treble into the chain space of row 31 between the two corner trebles and the first stitch. 1 treble in the next three trebles of row 32 – proceed with pattern as before.

Corner detail from Step 33. Copyright Angela Armstrong
The rest of the blanket will have to be posted separately.
Toni
I’ve had an enquiry about the little white accents between the large medallions at the ends of the blanket. I hope this graphic will help!
