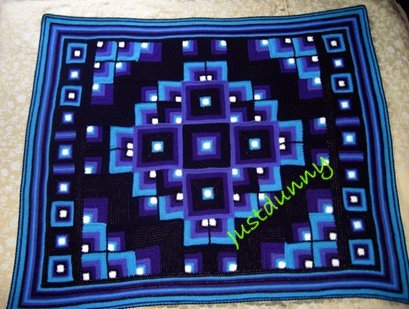
Original Mandala Geometric pattern reworked (UK)
As the time I spend developing patterns takes me away from crocheting for those most in need in Toowoomba, Queensland, Australia, please consider making a donation to PEACE Inc. as thanks for the use of this pattern -
http://www.thepeacefoundation.com.au/peace-donations.html
Many thanks for your help! If you see any errors or need help, please message me on Ravelry any time.

In allowing access to this pattern, I grant the right to make this blanket for your personal use. It would be a joy if it was acknowledged as a Justdunny design. I reserve all rights to text and images. Please do not copy, duplicate or distribute this pattern or contents.
Layout of squares & blocks
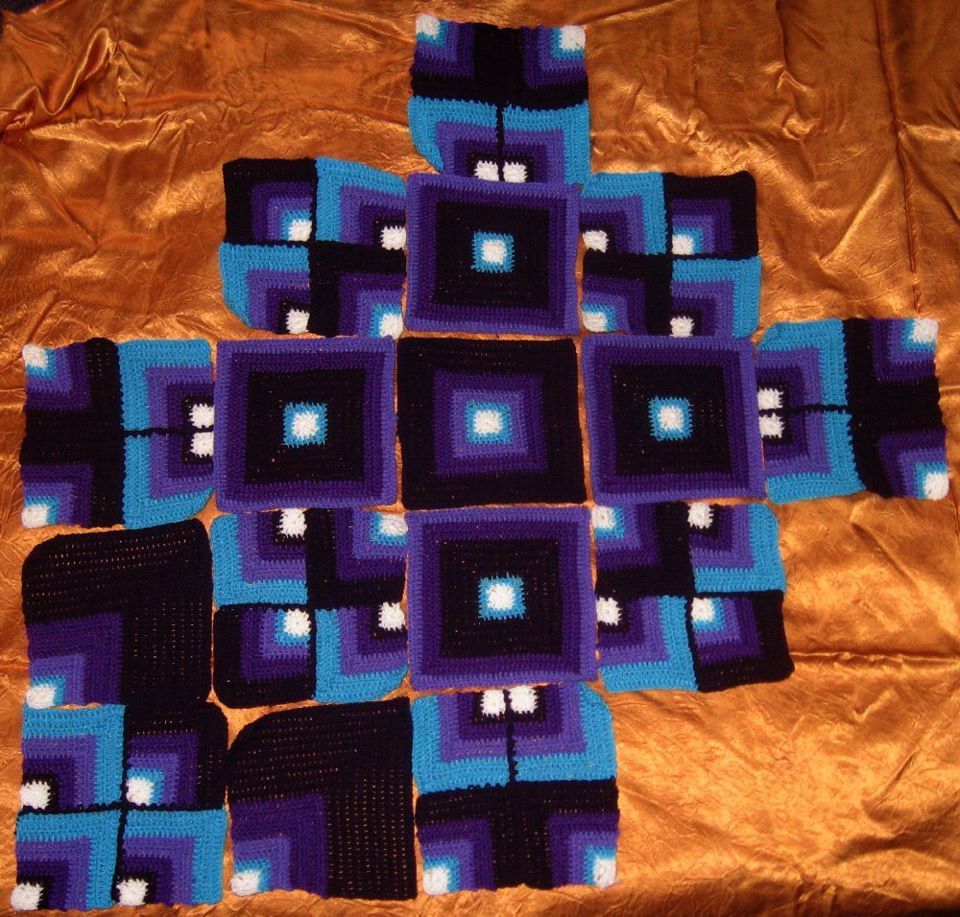

(Dots show where white corner should be placed)

Chart - solid granny square

Chart - solid mitred
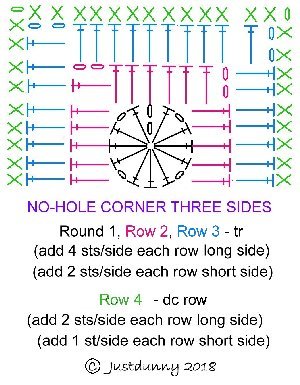
Chart - worked on 3 sides
Notes:
• Instructions use UK terms - tr = US dc, dc = US sc.
• The blanket was made using 8 ply (DK) acrylic yarn and a 4.00 mm hook. Gauge is not so important for a blanket. The size may vary, though. This blanket is about 6’ (180 cm) long by about 5‘ (150 cm) wide.
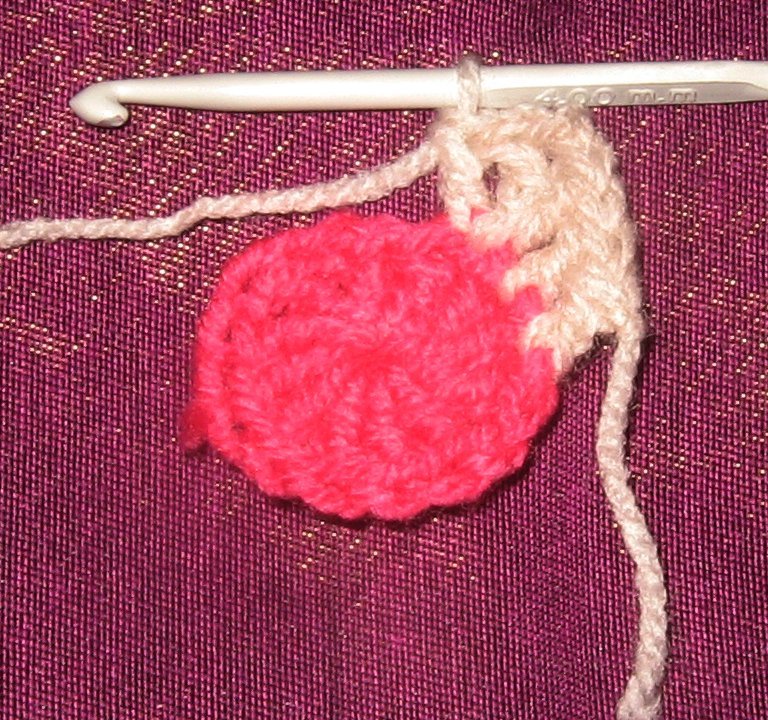
• I use a method similar to a magic ring for a very closed centre.
• All full rounds are finished by slip stitching to the beginning st. Stitch counts include first st – turning ch, standing st or other; tr or dc. Stitch counts include the 2 turning ch for no-hole corner laying horizontally.
• I use 2ch (not 3) for turning ch for a tr. Trust me, please! It is the only way to make the work square!
• When changing colour to begin a row, I use a standing stitch. Tutorial here - http://mrsbrownmakes.blogspot.com/p/standing-stitch-tutorial.html
• I weave all ends over the back loops as I go & crochet over them so when I finish crocheting, it’s finished!
• All 61 squares start with the same WHITE centre as the centre squares.
Squares needed
Large - 1 x sq1, 4 x sq2, 8 x sq3.
Smaller - 20 of small square 1
and 28 of small square 2 for 4, 5 & 6.
All 61 squares start with the same WHITE centre as the centre squares. The word block means smaller squares joined to make the same size as the large squares.
Colours used: from lightest tone to darkest.
White – small amount for centres – less than 1 ball.
A = Aqua –about 3 to 4 x 100g balls
B = Jacaranda blue – about the same.
C = Bright violet – about 2 to 3 balls
D = Deep purple – about 4 balls.
A word about turning ch

The corners on the right were made using 3 turning ch. In this case, it distorts the square dramatically.

Square made using 2 ch only with no-hole corner method.
These pictures show how important it is to use only 2 turning ch for the no-hole corner method. A note explaining - https://justdunnycrochet.svbtle.com/a-note-on-turning-ch-in-my-patterns
Instructions
Large Square 1 - CENTRE SQUARE:
Make one – no-hole corner method – 21 cm
1) With WHITE, use magic ring or other method to get a closed centre, 2 ch for 1st tr, 1 tr, (1 ch, 3 tr) 3 times, 1 ch, 1 tr, sl st to starting ch. Break off.
(ch, 3tr, ch = 5 sts/side)
2) With A, work a standing tr into the middle tr of a group of 3, tr into next tr, tr into the corner ch (not into the ch sp), 2 turning ch, do not turn over.
No hole corner
You’ll work in the same way you would if you have turned the work over to start a new row back, but instead you’ll turn the work around to work the next side.

Let go of your work, letting it hang from the turning ch with right side facing you. Keeping the right side facing, pick up the work so the turning ch are ready to start the next side.
The last tr worked is now lying across, not standing up.
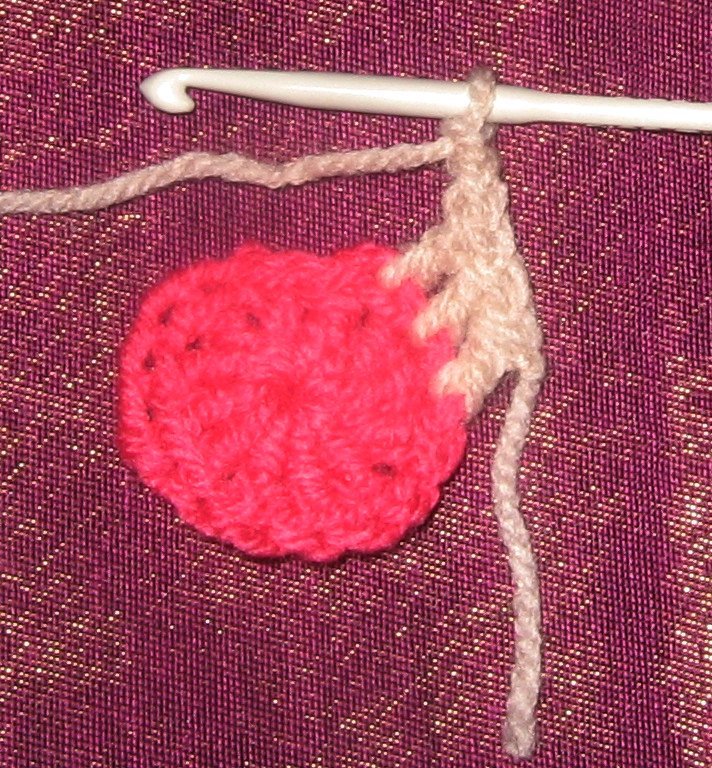
Work 1 tr into the body of it. I find if you insert the needle close to what was the bottom of the st, it works fine. There are 3 strands in the st. You need to pick up 2 of them for the st to sit well)…

and then work 1 tr into the ch st in the corner (same place as the last tr of the last side worked).
**Work 1 tr into each of next 3 tr, tr into corner ch, 2ch. Rep no-hole corner.

Repeat from ** to last tr & sl st to beg. (7tr, 2ch = 9 sts/side)
3) With B, work standing tr in middle of one side. Work as for rnd 2. Don’t break off. (13 sts/side)
4) Turn work over, work one one rnd of dc – 1 turning ch, 1 dc in each tr, dc into each of the 2 turning ch, *1 turning ch, let go of work & pick up for new side. Work 1 dc into the same place as the last dc worked, dc into each tr & turning ch. Rep from * to end & sl st to beg.
Break off. (15 sts/side) I preferred the look of the dc row worked on wrong side, but it’s up to you whether you turn or not.
5) & 6) With C, work 2 rnds of tr. (19, 23 sts/side) Can be turned over between rnds or all worked with right side facing as I’ve done.
7) to 10) With D, work 4 rnds of tr. (27, 31, 35, 39 sts/side) Break off.
Large square 2 - Make 4
(Rounds worked same way as centre square 1) 21 cm
1) With WHITE, work centre in the same way as the centre square.
2) With A, work 1 rnd tr.
3) to 6) With D, work 4 rnds tr.
7) & 8) With C, work 2 rnds of tr.
9) & 10) With B, work 1 rnd tr, turn over, 1 rnd dc. Break off.
Large square 3 - Make 8 mitred squares.
1) White centre, break off. All rows now worked on 2 sides only with no-hole corners.
2) With A, work 1 row tr. Break off. (7 sts/side)
3) to 5) With B– 2 rows tr, then 1 row dc. Break off. (9, 11, 12 sts/side)
6) to 9) With C – 4 rows tr. Break off. (14,16, 18, 20 sts)
10) to 19) With D, work 10 rows tr. Break off. (40 sts/side)
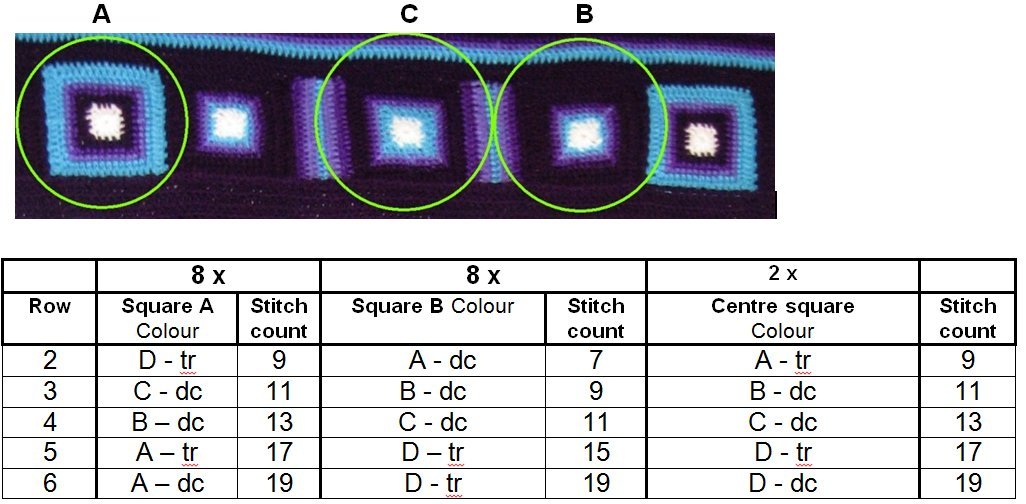
Blocks assembled from smaller squares
Three sets of these blocks made from only two different small mitred squares, just assembled in a different way.
In total, you need – 20 of Small Square 1 and 28 of Small Square 2.
Make white centre, break off. (ch, 3tr, ch = 5 sts/side) All rows now worked on 2 sides only. The 2 turning ch for tr count as 2 sts in st count.

See picture & diagram at top to join these into the large blocks 4, 5 & 6. Join all for the central design.
(39 x 5 = 195 sts/side)
To make the blanket rectangular, I added a row of small squares to two sides. Work 4 rows of tr in D on two opposite sides of the central design.
Squares all begin with the same white centre & are worked as for the large centre squares.
CENTRAL SECTION: © Take one of the centre small squares.
1) With C work tr along one side only. Break off.
2) With B work 1 row tr over row 1.
3) With A work 1 row dc over row 2.
4) With B work 1 row tr.
5) With C work row tr.
Work same rows on the opposite side.
Join squares as in the main picture - ABABCDBABA. With D, work 1 row of tr around the whole strip. (19 x 9 = 171 + 20 = 191 + 4 = 195)
I crocheted around the blanket using the same no-corner method at the corners, alternating the colours depending on whim and availability – 12 rows in this case. I finished with a row of crab stitch – just work dc from left to right, ie backwards.
So many thanks to Tammy (takdpm on Ravelry) for her excellent feedback & suggestions. It’s inspired me to re-think pattern writing!
I hope you enjoy making this.
Justdunny (Toni)
December 2018