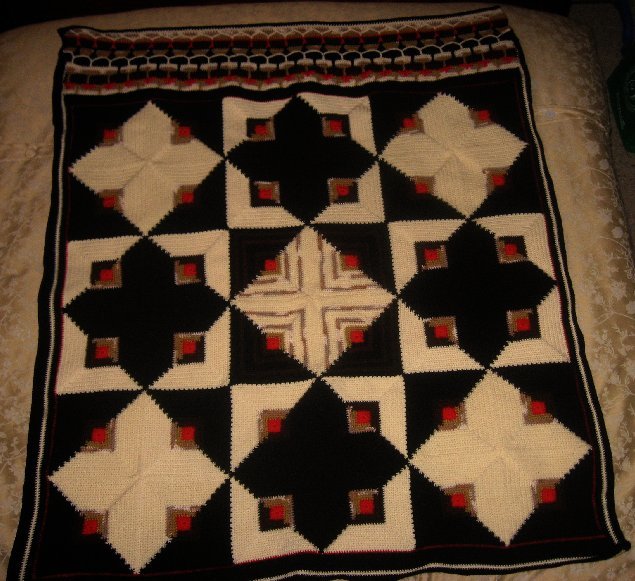
Traditional Log Cabin blanket
by Justdunny (Toni)
You are welcome to make items from this pattern for your own use. Please do not duplicate, distribute, re-post or copy any of the contents. You are welcome to link to this page.
NOTES
All rows begin with chain substituting for the first stitch or a standing stitch. I have used three different squares with slight changes in colour layout. A chart is included in the written instructions.
MATERIALS
For the square pictured, I’ve used 8 ply (DK) acrylic yarn with a 4.25 mm (US G) hook.
This pattern does not require a specific tension or yarn, but the size of the square will vary with different materials.
ABBREVIATIONS
NOTE – I have used UK terms throughout.
• beg – beginning
• ch - chain
• sl st – slip stitch
• dc – double crochet (US sc)
• tr – treble (US dc)
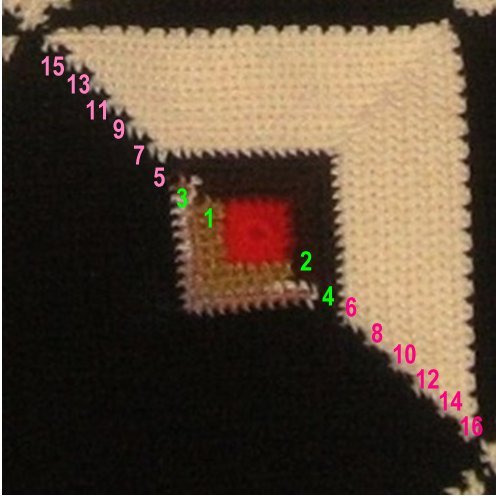
COLOUR CHART for blocks worked after centre
Please note – all centres are worked in red in the pictured blanket. The first 4 colours are used for one “block” each (2 rows of dc worked on 2 sides), then break off. The solid colours after that can be worked without breaking off. Blocks of colour alternate from one half of the square to the other.

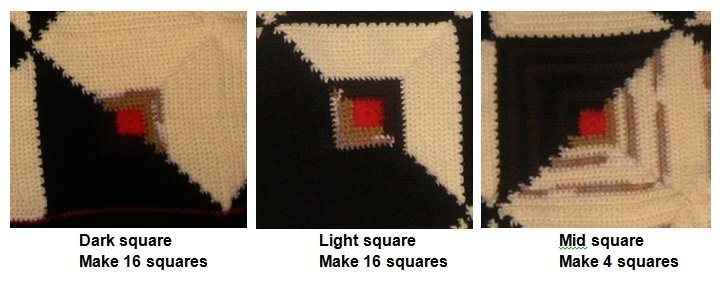
Examples of the three different squares -
INSTRUCTIONS
Centre – with red –
Into a chain ring or magic circle work starting ch (to substitute for first tr), 1 tr in next, 1 ch, (3 tr, 1 ch) three times, 1 tr. Sl st to beg st. You will have 4 groups of 3 treble separated by 1 ch. The ch sts will form the corner stitches.

First block of colour
Join the first dark colour to a corner chain. See chart above.
- Work 1 dc (starting ch or standing st) into corner ch, each of the 3 tr and the next corner ch (5).
- Turn work over. Work 1 dc into each dc. (5)
- Turn work around so that the side just worked is to the right side and the next side to be worked is at the top. Work 1 ch as starting st (or standing st), 1 dc into the body of the dc at the end of the next white row of dc, then 1 dc into the black corner st, 1 dc into each of the 3 tr, 1 dc into next corner ch. (7)
- Turn work OVER. Work 1 dc into each dc. (7) Break off.
THIS SQUARE CAN BE WORKED IN TWO COLOURS (PLUS THE CENTRE COLOUR) WITHOUT BREAKING OFF.

Second block of colour
Join the first light colour to the corner chain that hasn’t been worked yet.
- Work as for first block to corner ch (5), then work 1 dc into each dc at the end of the two dark rows (7).
- Turn work over. Work 1 dc into each dc. (7)
- Turn work around so that the side just worked is to the right side and the next side to be worked is at the top. Work 1 ch as starting st (or standing st), 1 dc into the body of the dc at the end of the other same colour row, then 1 dc into the corner st of the centre, 1 dc into each of the 3 tr, 1 dc into next corner ch, 1 dc into the next 2. (9)
- Turn work OVER. Work 1 dc into each dc. (9) Break off.

Third & Fourth blocks of colour
Work the third block in the same way using darker brown. Stitch count – 9, 9, 11, 11.
Work the fourth block in the same way using ombre light brown. Stitch count – 11, 11, 13, 13.
From this point, work in colour without breaking off to the desired size. Work one colour block on one side, then the other colour block on the other side.
When squares are completed, assemble dark squares into blocks of 4 with cream turned to the centre; the light squares with black turned to the centre; and the centre squares with the cream turned to the centre. I’ve worked a row of red in dc around the edged, then worked other rows to finish.

Work the other half of the block -

Return to the first side worked and continue -

Work the second block of colour on the other side -

Now work the solid blocks of colour (black and cream) -
Join the next colour in sequence from chart to the corner.

Turn to work the other corner, join the other colour in sequence -

Continue to work alternately on each side -

Work until 6 blocks have been worked in each colour over the central part -

Total of 16 blocks of colour over two sides -
I hope you enjoy making this!
Toni